Canva & n8n Integration Guide
Step-by-step guide to connect Canva with n8n for workflow automation.
คู่มือเชื่อมต่อ Canva กับ n8n เพื่อสร้างระบบอัตโนมัติ
📝 How to Autofill Canva Templates with n8n
วิธีเติมข้อมูลอัตโนมัติใน Canva ด้วย n8n
To autofill Canva templates using n8n, you first need to establish a secure connection between your Canva Developer app and n8n using OAuth2 with PKCE. This process involves configuring both the Canva Developer Portal and n8n credentials, followed by setting up your Canva template for autofill and then implementing a series of HTTP requests in n8n to manage the template autofill workflow.
เพื่อเติมข้อมูลอัตโนมัติในเทมเพลต Canva โดยใช้ n8n คุณต้องสร้างการเชื่อมต่อที่ปลอดภัยระหว่างแอป Canva Developer และ n8n โดยใช้ OAuth2 with PKCE กระบวนการนี้ประกอบด้วยการกำหนดค่า Canva Developer Portal และข้อมูลรับรอง n8n จากนั้นตั้งค่าเทมเพลต Canva สำหรับการเติมข้อมูลอัตโนมัติ และใช้งาน HTTP requests ใน n8n เพื่อจัดการเวิร์กโฟลว์การเติมเทมเพลต
1. Set Up Your App in Canva Developer Portal
1. ตั้งค่าแอปใน Canva Developer Portal

- Go to Canva Developers Portal
- Click Your Integrations → Create a new integration.
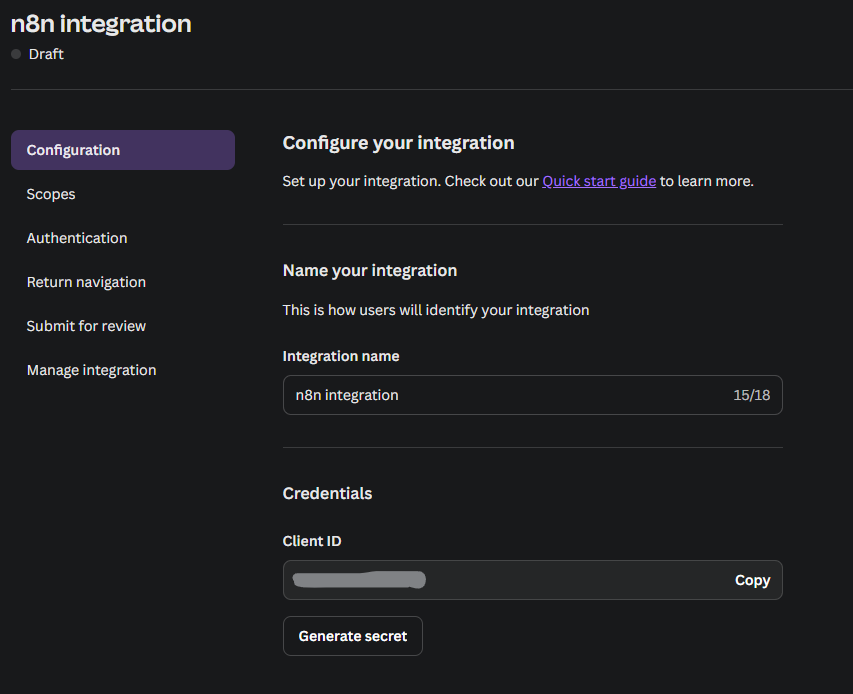
- Select public and give it a name (e.g. "n8n Integration").
- ไปที่ Canva Developers Portal
- คลิก Your Integrations → Create a new integration
- เลือก public และตั้งชื่อ (เช่น "n8n Integration")
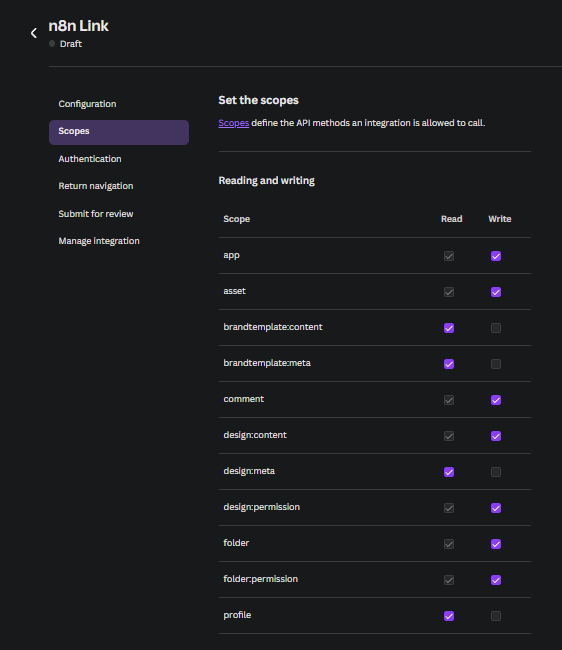
- Go to Scopes and select all checkboxes, or choose only those you need (see full list below).
- ไปที่ Scopes และเลือกทุกช่องหรือเลือกเฉพาะที่ต้องการ (ดูรายการด้านล่าง)
- Go to Authentication and add this OAuth Redirect URL:
- ไปที่ Authentication และเพิ่ม OAuth Redirect URL นี้:
https://oauth.n8n.cloud/oauth2/callback
- Return to Configuration, generate and copy the Client ID and Client Secret.
- Save your integration.
- กลับไปที่ Configuration สร้างและคัดลอก Client ID และ Client Secret
- บันทึกการรวม (integration) ของคุณ
Recommended Scopes:
app:read app:write asset:read asset:write brandtemplate:content:read brandtemplate:meta:read comment:read comment:write design:content:read design:content:write design:meta:read design:permission:read design:permission:write folder:read folder:write folder:permission:read folder:permission:write profile:read
2. Create OAuth2 Credential in n8n
2. สร้าง OAuth2 Credential ใน n8n
- In n8n, go to Credentials → New Credential → OAuth2 API.
- Fill in the fields as follows:
- ใน n8n ไปที่ Credentials → New Credential → OAuth2 API
- กรอกข้อมูลในช่องต่างๆ ดังนี้:
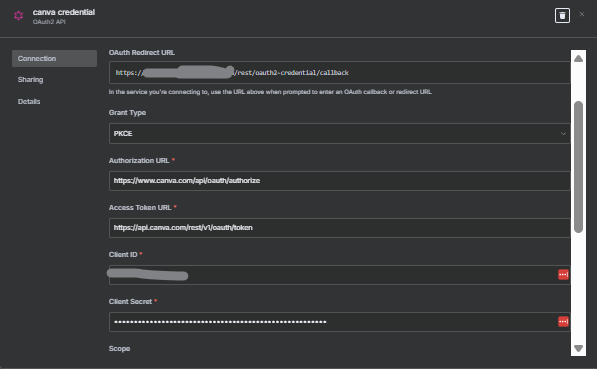
- OAuth Redirect URL:
https://oauth.n8n.cloud/oauth2/callback
- Grant Type: PKCE
- Authorization URL:
https://www.canva.com/api/oauth/authorize
- Access Token URL:
https://api.canva.com/rest/v1/oauth/token
- Client ID: (Paste from Canva)
- Client Secret: (Paste from Canva)
- Scope: (Paste all scopes from above)
- Authentication: Header
- Auth URI Query Parameters:
response_type=code
or
access_type=offline
(optional)
- Click Save and then Connect to authorize Canva. You should see a success message.
- Optionally, rename your credential (e.g., "Canva credential").
- คลิก Save แล้วคลิก Connect เพื่ออนุญาต Canva คุณควรเห็นข้อความสำเร็จ
- หากต้องการ สามารถเปลี่ยนชื่อ credential (เช่น "Canva credential")
3. Test the Connection
3. ทดสอบการเชื่อมต่อ
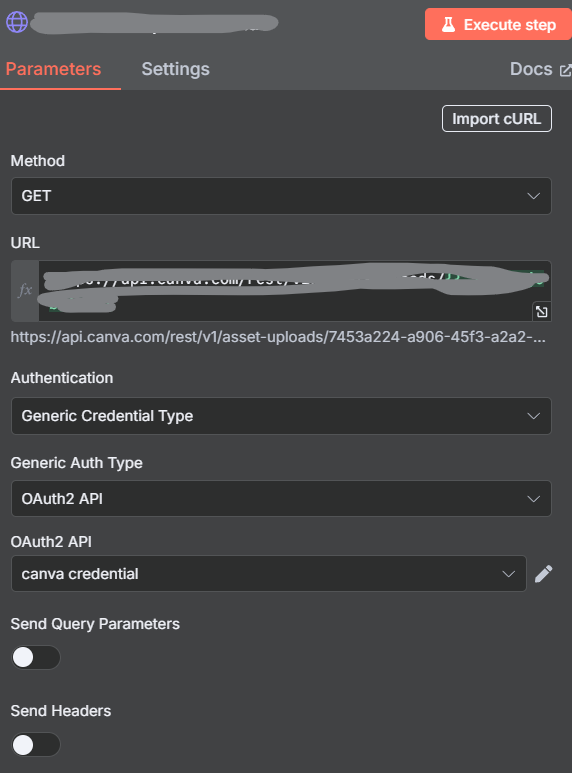
- Add an HTTP Request node in your n8n workflow.
- Configure:
- เพิ่ม HTTP Request node ในเวิร์กโฟลว์ n8n ของคุณ
- กำหนดค่า:
- Method: GET
- URL:
https://api.canva.com/rest/v1/users/me
- Authentication: Generic Credential Type
- Generic Auth Type: OAuth2 API
- OAuth2 API: Select your Canva credential
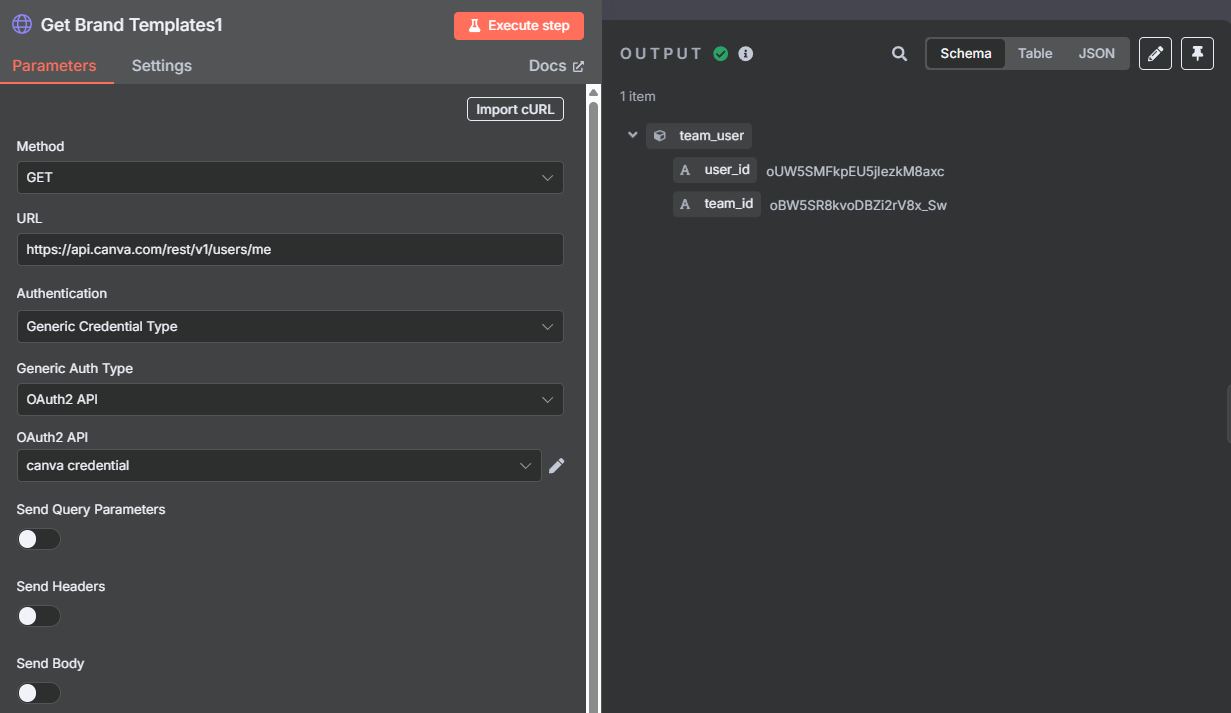
- Click Test Step. You should receive your Canva
user_idandteam_idin the response.
- คลิก Test Step คุณควรได้รับ
user_idและteam_idของ Canva ในการตอบกลับ
เคล็ดลับ: ดูรายละเอียดการใช้งาน API และการเติมเทมเพลตที่เอกสาร Canva
🔧 Troubleshooting & Resources
การแก้ไขปัญหา & แหล่งข้อมูล
- Make sure your n8n instance is publicly accessible for OAuth2 callback
- Check API permissions and scopes in Canva Developer Portal
- Review n8n logs for credential/auth errors
- Canva API Docs: https://www.canva.com/developers/docs/apis/
- n8n Community: https://community.n8n.io/
- ตรวจสอบให้แน่ใจว่า n8n instance ของคุณสามารถเข้าถึงได้สาธารณะสำหรับ OAuth2 callback
- ตรวจสอบสิทธิ์ API และ scopes ใน Canva Developer Portal
- ตรวจสอบ n8n logs สำหรับข้อผิดพลาดเกี่ยวกับ credential/auth
- เอกสาร Canva API และชุมชน n8n (ลิงก์ด้านบน)
Success!
สำเร็จ!
ถ้าทุกอย่างดูเรียบร้อยดี แสดงว่าการเชื่อมต่อ Canva กับ n8n ของคุณพร้อมใช้งานแล้ว!